

")
")
")
Description of the control program ver.1.2.5
I am publishing the second version of the control program for HW 1.0. Although more extensive, it is still just a trial version. Take the program mainly as a source of information for those who will want to continue my work. I will probably not write another version of the program for controlling HW 1.0. The basis of the program is still the web server node.js and communication with it using javascript.
The main extension of the program is the addition of 20 preset buttons. After filling them with data, it is possible to automatically rotate the dish to predetermined positions. However, this version of the program does not contain custom preference settings. This must be done manually using a text editor.
The preset information is stored in the config.ini file. Each section contains three items:
- PosAZ - number of azimuth counter pulses
- PosEL - number of elevation counter pulses
- Name - preset number and satellite name
The first section [Default] contains the current position. It is saved after any change of position. It is loaded at the moment the program is started. The following sections [mem01] to [mem20] are individual presets. Their values are initially zero. This behaves as if they are switched off and nothing is started when the preset button is pressed. Only after filling in the data are the buttons activated and the resetting of the dish to the new position starts.
After connecting the web browser to the server, the following screen will appear:
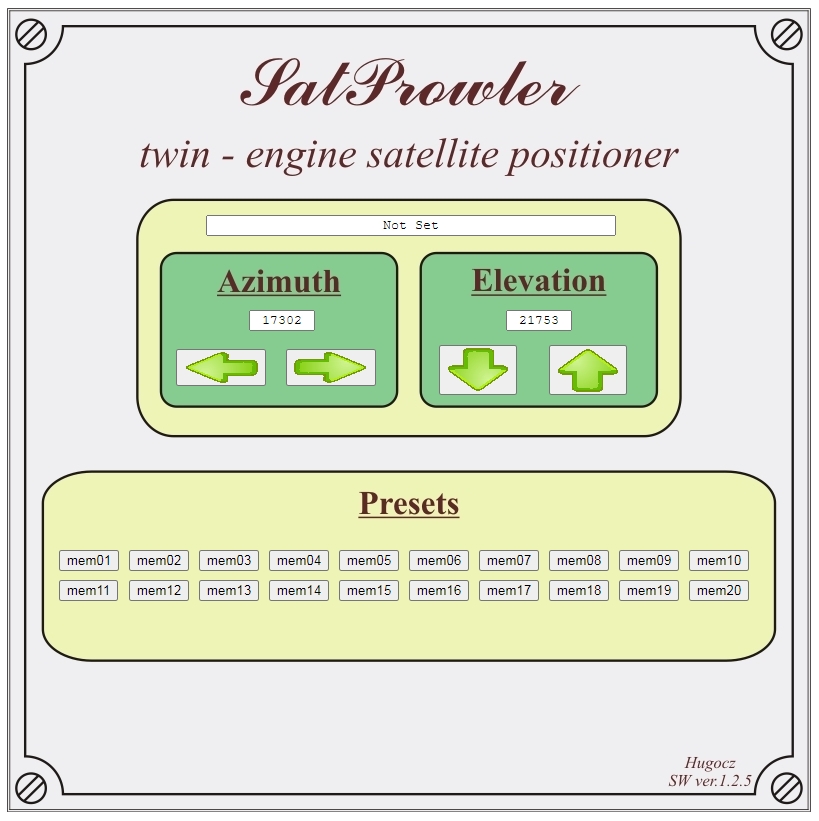
Pressing any arrow button starts the corresponding motor. When released, the engine stops again. If you press the button, move the mouse outside it and release the mouse, the motor will remain running. Click the same button to stop it. Beware of this error. If you have to use the arrow key to run for a long time, you must hold the mouse over the button.
When the engine is stopped, the current position is displayed in the windows below "Azimuth" and "Elevation". Not Set is displayed in the upper window designated for the satellite name. The current position is not displayed during rewinding. So there is no way to know that the engines are running. However, the program must run in the terminal window and the change of position is continuously displayed there.
Just click on the preset buttons mem01 to mem20. If the azimuth and elevation values are zero, nothing happens. If they contain a non-zero value, the positioner starts the motors and sets the dish to the new position. During the movement, nothing changes on the screen, so again it is not known that the motors are active. This can take tens of seconds at longer distances. However, the position change is also displayed in the terminal window in this case. After stopping, the values of the new position are displayed in the respective windows. The satellite name is displayed in the upper window. All three data are saved in the config.ini file in the [Default] section.
To program presets:
In the config.ini file, azimuth and elevation values are zero for all presets. This will ensure that the program does not respond to these preferences before being set correctly. In the [Default] section, the current positions are set to 50000. As a result, the position values cannot reach negative numbers when the motors are started for the first time, because the maximum range of motion is approximately 30,000 pulses.
First you need to set both zero points. To set the zero point of the azimuth, hold down the left arrow button. The value of the azimuth position in the first column is constantly decreasing in the terminal window. The third column signals that the zero point has been reached by changing the value "True" to "False". At this point, the engine needs to be stopped. Due to the inertia of the motor, the positioner crosses the correct zero point. Therefore, you still need to go back using the right arrow button. When the value in the third column changes from "False" to "True" in the terminal window, the positioner has reached the correct zero point value. Even if the motor cannot be stopped at this exact moment, the program sets the azimuth value to 0 and then calculates the correct position. This sets the zero azimuth position.
In a similar way, it is necessary to set the zero elevation position. First, hold down the down arrow button. The elevation value decreases in the terminal window in the second column. In the fourth column, reaching the zero point is indicated by changing the value from "True" to "False". At this point, the engine needs to be stopped. We return a bit again with the up arrow button. The moment the change in the fourth column of the terminal window from "False" to "True" is recorded by the program as reaching the correct zero point, resets the elevation value and from now on it calculates the correct position.
IMPORTANT NOTE: My EGIS positioner is not designed to move beyond zero points. Therefore, it is very important to approach the zero points very carefully and to stop the engines as quickly as possible after reaching them. Otherwise, the positioner may be mechanically damaged.
After setting the zero points, we can focus on the individual presets. Use the arrows to move to the selected satellite. We note the value of its azimuth and elevation together with the name of the satellite on paper. We can repeat this for all required satellites. Once we have collected the necessary data, we write it using a text editor to the preferences in the config.ini file. After any change in this file, we must restart the node.js program to load the new data. Never manually change the values in the [Default] section. This would violate the integrity of the current positioner position and the zero points would have to be set again.
After some time of using this trial version of the driver, it started to bother me that it is not clear which satellite is stored under which preset. Therefore, after programming the preferences, I added the names of the satellites to the index.html file. At the end of it, the preset buttons are written as a button with the value id = "memory01" to "memory20". If we add the appropriate satellite names to these buttons in the title item, they will be displayed when the mouse hovers over the button.
From a professional point of view, the program has many shortcomings. But it is still not intended for normal use. It is just a matter of testing the functionality of hardware version 1.0. Nevertheless, I must point out that I am not responsible for all errors that may occur during operation. The program is based on running javascripts. And it very much depends on how which web browsers access javascripts. During testing, I soon found out that when using IE11, the program behaves very abnormally. That's why I gradually switched to Google Chrome during development. With it, all functions of the program behave correctly. I haven't tested other browsers.
You can download the source texts of the program here.