

")
")
")
Description of the control program ver.1.3.3
Important warning: Control program version 1.3.3 is intended for HW1.0. It cannot be used for the new HW2.x version or any later version. The reason is the different use of GPIO pins in the first design!
You can download the program here. Unzip the file. Using an ftp client, copy the content to the /home/pi/ directory on the Raspberry Pi. This will create the satprowler directory with the necessary subdirectory and file structure as described in the Python Guidelines article. According to this article, you should be able to run the program on the Raspberry Pi. I recommend using terminal mode first. Once you have verified that the program is working properly, you can switch to permanent operation. In both cases, a web server is activated, which can be communicated with any web browser.
1) Using the program
The program is used by connecting to its web server on the Raspberry Pi with any browser from a PC. I use Google Chrome, in which all the controls are displayed correctly. Enter in the address bar
http://192.168.xxx.xxx:8080
The numbers 192.168 mean access to your local (home) network, where web browsers will not require https encrypted communication. xxx.xxx is the address of your Raspberry Pi. The number 8080 is the default port on which the server listens. After connecting, the following page will appear in your browser. 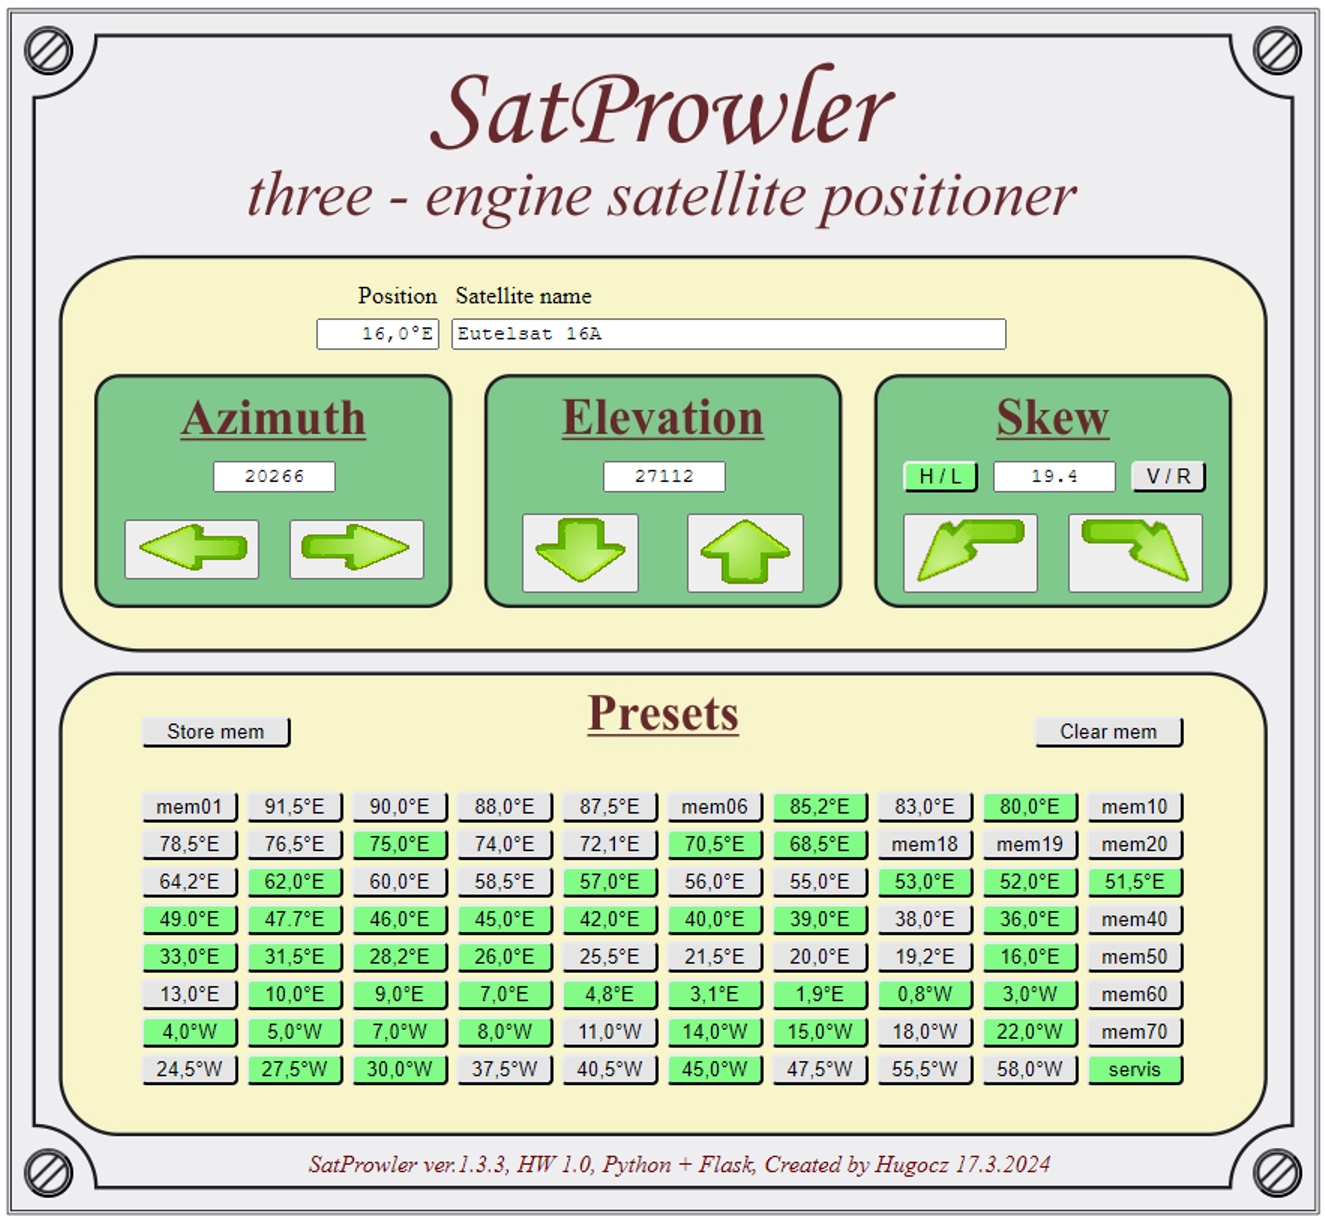
Fig. 1 - User interface of the program
Positioner control is divided into two yellow panels. The upper one is used for direct manual control of the motors, the lower one contains presets and their management. The manual controls have a separate green section for each motor.
The Azimuth section has two buttons and a window with the current position. The AZ motor rotates as long as the button is pressed. The position should range from 0 ÷ 36,000. The elevation setting is identical. The Skew setting is a bit more complicated. First of all, you need to have HW1.0 extended with the servo motor module. The basic function is to rotate the single-polarity LNB by 90°. This represents switching the polarity Horizontal / Vertical, respectively Left / Right. This is ensured by the H/L and V/R buttons. But for different azimuths, it is necessary to add a value of Skew to these two basic positions. And it is set with the left or right arrow keys. As a servo motor, I tried the Corotor Chaparral for C-band and the CSP 1210 C polarizer.
The presets are easy to use. If they are programmed, they have a green color and the information from the Position window in the label. Just click the button. The motors will automatically start rotating to the specified position. So far, gradually, first the azimuth is set, then the elevation and finally the Skew. I have yet to solve the simultaneous rotation of all motors.
If we need to program a new preset, we first set the correct position manually. In the upper windows Position and Satellite name, we write the required data. Then we click on the "Store mem" button. This activates the write-to-preset mode - this button turns red. Then we click on the preferences button in which we want to save the current state. This copies all data from the manual panel to the selected preset. At the same time, the description of the preset button and its color will change to green. This means that the preset is used. Programming a preset does not check if this preset was empty or already programmed. This allows the old preset data to be directly replaced with new ones. But beware of accidentally overwriting another preset.
If we just want to delete the preset, we click on the "Clear mem" button. This will activate delete mode - this button will turn red. Then we click on the preferences button and all saved data will be deleted. At the same time, the color of the preset button changes from green to gray. This means that the preset is free.
If we clicked the "Store mem" or "Clear mem" button by mistake, click it again. This will cancel the activated mode.
The program has one more part prepared, which is not finished yet. If you click the mouse on any screw, the service page will open. Here it will be possible to set the zero positions of azimuth and elevation.
If you want to set the zero azimuth and elevation positions now, you have to use the program's terminal mode for now. The values of the AZOrigin and ELOrigin switches are also displayed in the terminal when the motors are operated manually. First, manually rotate the motor eastward until the AZOrigin value changes from 1 -> 0. At this point, stop the motor as quickly as possible. Then manually rotate the motor to the west. When the AZOrigin value changes from 0 -> 1, the azimuth counter is automatically reset. The elevation zero point is set in the same way. First, manually rotate the motor down until the ELOrigin value changes from 1 -> 0. At this point, stop the motor as quickly as possible. Then manually rotate the motor upwards. When the ELOrigin value changes from 0 -> 1, the elevation counter is automatically reset.
Approaching the zero position is not absolutely necessary for the operation of the positioner. If you decide to set zero points, watch the status of the Origin switches in the terminal very carefully. Motors spin too fast. Both zero points must be set when all presets are empty. Changing the value of the counters would lose synchronization of the presets with the desired position.
2) User modifications of the program
Running a program on a Raspberry Pi just means starting a web server. The server itself does nothing, it just waits for user commands. By default, it expects these on port 8080. If you want to change this port, open the satprowler.py file in a text editor and scroll to the end of it. Find the line there
app.run(host='0.0.0.0', port=8080, debug=True)
Here you can change the port number. Do not forget that some ports already have a generally defined use and it is not a good idea to use them for anything else. After accessing the file, the program needs to be restarted.
For those who do not have experience with the Python language, it is necessary to emphasize one of its peculiarities. Spaces at the beginning of lines have the function of dividing the code into separate blocks. If you change the number of these leading spaces without knowing what you are doing, your program will crash and not run. That's why you have to use a text editor that doesn't add anything else to the file without your knowledge. You can't really use Word from Office. I use the PSPad program, which can differentiate the text by color depending on the file extension and thus make it clearer. You can download PSPad here.
Another file you might edit in a text editor is config.ini. This file stores the data of individual presets. Presets are labeled [mem01] through [mem80]. The number of presets cannot simply be expanded by adding additional items to this file. Their support by modifying the program is also needed. Each preset contains data according to the following table.
| Item | Meaning | The range of values |
| [mem01] | preset label, do not change | mem01 ÷ mem80 |
| posaz | motor position AZ | 0 ÷ 36 000 |
| posel | motor position EL | 0 ÷ 32 000 |
| skew | servo1 position | 500 ÷ 2500 |
| satpos | position description (preset) | text UTF8, 7 characters |
| satname | satellite description | text UTF8, 43 characters |
After manually changing the content of the config.ini file, the satprowler.py program needs to be restarted. If the value of posaz and posel is zero, the program marks such a preference as empty (the preference button is gray). The first entry [Default] contains the current state of the positioner. The program overwrites it at the moment each motor stops. If you change it manually, the synchronization between the preset data and the desired pointing of the positioner will be lost. Unlike the presets, the [Default] entry also has a polar item, where information about the currently set polarization is stored.
You will have no reason to interfere with other files. All program text files are in UTF-8 text encoding mode.
Important warning: Python is a scripting language. Running the program does not guarantee that all parts of it work correctly. During any experiments, it should be noted that EPS-203 motors do not have limit switches. If the program crashes while any motor is running, it is NECESSARY to turn off the 24V source as quickly as possible. Therefore, carry out all your modifications with caution and constantly check the condition of the EPS-203 motors.
3) Known program bugs
- Here I have to point out one important bug in the program that I haven't solved yet. Applies to manual control of Azimuth and Elevation motors. The motors are controlled by two separate commands. Turning on the engine represents pressing the control button by pressing the left mouse button. Turning off the engine means releasing the same control button, i.e. releasing the left mouse button above this control button. When you press the control button, the motor will start, then move the mouse away from the button and release the left mouse button, the motor will not stop. Pressing and releasing the left mouse button must be done over the same control button so that the motor receives the command to turn off after the command to turn it on. If you happen to "mouse" the mouse somewhere else while pressing the button, you have to click the used button again. This will send the control button a second command and the motor will stop.
- The motors are not yet controlled simultaneously, but sequentially. This means that clicking on a preset will set the azimuth first and then the elevation. Parallel thread programming, i.e. simultaneous control of both motors, I am still studying.
- The service page is still only symbolic. Its functionality will be developed later.